

Why Vinyl Wraps Fail and How to Prevent It
posted 6th May 2026
Why Vinyl Wraps Fail (And How to Protect Your Investment)
Vinyl wraps are engineered to be durable, high-impact, and visually striking.
When premium materials meet expert installation, your vehicle becomes a high-performance branding tool that works as hard as you do.
But here is the cold reality: Not all wraps are created equal.
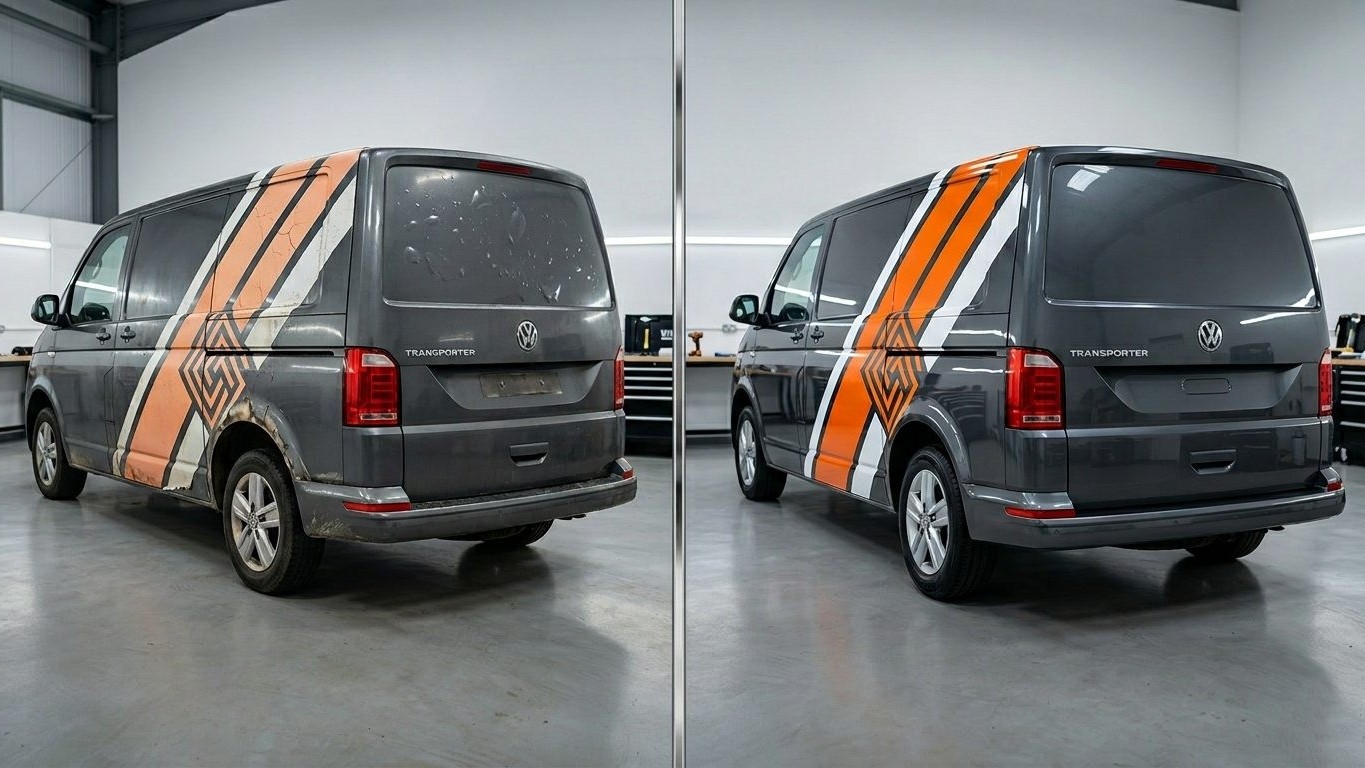
We’ve all seen them - vans with peeling edges, unsightly bubbling, or sun-bleached graphics.
That isn't just a technical failure; it’s a branding disaster. For a business fleet livery, a failing wrap quickly shifts from a professional asset to a poor reflection of your standards.
The good news? Most vinyl wrap failures are 100% avoidable.
In this expert guide, we’re pulling back the curtain on:
- The Root Causes: Why even "premium" wraps can fail.
- Prevention Tactics: How to ensure your wrap lasts for years, not months.
- Fleet Recovery: What to do if your current graphics are already showing signs of wear.
At a Glance - Prevention is Profit
- ✔ Longevity - Learn the 3 pillars of a 5+ year wrap life.
- ✔ Red Flags - Spot bubbling and lifting before they become permanent.
- ✔ ROI - How high-quality installation saves you thousands in re-wrap costs.
Identifying the Red Flags: What Does Vinyl Wrap Failure Look Like?
Vinyl wrap failure rarely happens overnight.
It usually begins with subtle warnings that, if ignored, can escalate into an expensive problem.
For business owners, catching these signs early is the difference between a quick trim-fix and a costly full-fleet removal.
Keep a close eye on these five common symptoms of a failing wrap:
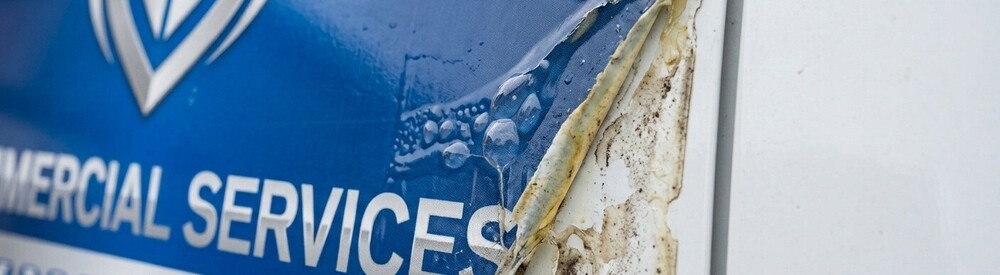
- Edge Lifting: Often found around door handles, wheel arches, and panel seams.
- Surface Bubbles: Small pockets of air or gas trapped between the vinyl and the paintwork.
- Stress Cracking: Tiny splits in the material, usually in deep recesses or sharp contours.
- UV Degradation: A loss of colour vibrancy or a "chalky" texture on the surface.
- Adhesive Delamination: Large sections of the wrap losing their bond and pulling away from the substrate.
Symptom 01
Lifting & Peeling
Usually starts at panel edges or deep recesses where the vinyl tension is highest. Look closely at door handles and wheel arches.
Symptom 02
Air Bubbles
Trapped air or moisture under the surface, often caused by poor surface preparation or material "out-gassing."
Symptom 03
Cracking & Crazing
The vinyl becomes brittle and "shatters" in small areas, typically due to extreme UV exposure and lack of aftercare.
Symptom 04
UV Fading
Sun damage attacking the pigments, making your brand look tired and unprofessional compared to your competitors.
The 6 Most Common Causes of Vinyl Wrap Failure
Understanding why wraps fail is the first step toward ensuring your investment lasts.
While modern vinyl is incredibly advanced, it relies on a specific set of conditions to perform.
1. Inadequate Surface Preparation: The "Silent Killer" of Wraps
Surface preparation is the foundation of every successful installation.
In fact, it is the number one cause of premature adhesion failure.
For vinyl to bond on a molecular level, the vehicle substrate must be surgically clean. Even invisible contaminants - such as silicone from car washes, wax residue, or natural oils from skin - act as a barrier between the adhesive and the paint.
Common Preparation Pitfalls:
- Chemical Residue: Failing to remove waxes, polishes, or ceramic coatings.
- Hidden Moisture: Trapping water in seals or under badges that "weeps" out during installation.
- Surface Damage: Attempting to wrap over "lacquer peel" or rust, which provides zero structural integrity for the vinyl.
- Rushed Decontamination: Skipping the clay bar or isopropyl alcohol (IPA) wipe-down stages.
🚨 Why it matters
Without a "surgically clean" surface, the adhesive never achieves a 100% bond. This doesn't just cause bubbles; it leads to catastrophic lifting within weeks - often requiring a complete and costly strip-back and re-install.

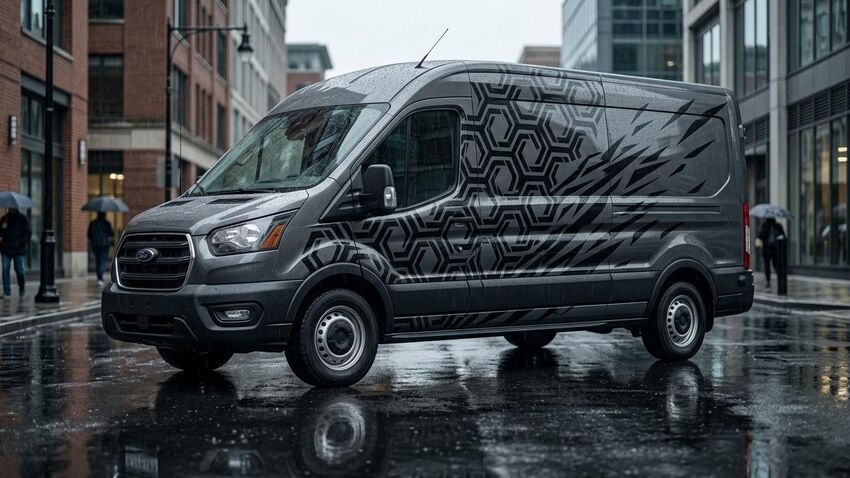
2. Low-Quality Materials: The High Cost of "Budget" Vinyl
In the world of vehicle graphics, you truly get what you pay for.
Many "budget-friendly" installers keep costs down by using materials that were never engineered for the rigours of the road.
While a cheap wrap might look acceptable on day one, it lacks the molecular "memory" required to stay bonded to your vehicle.
Why "Budget" Materials Fail:
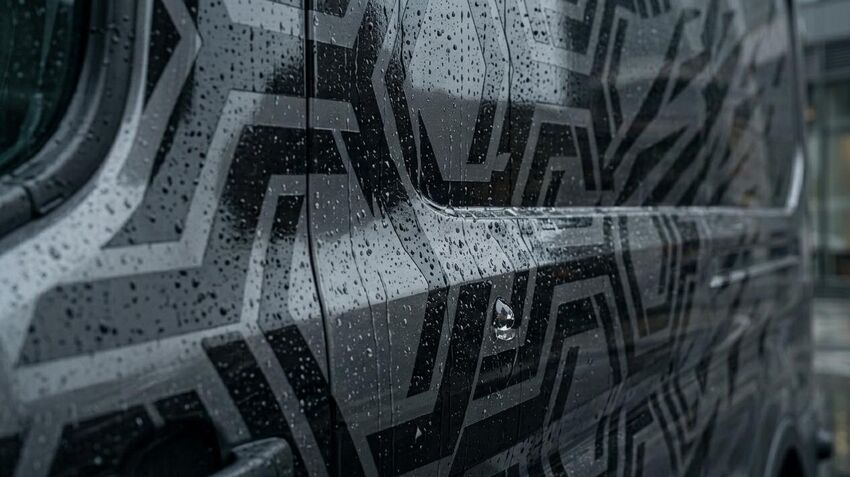
- Calendered vs. Cast Vinyl: Calendered vinyl is thicker and cheaper; it "wants" to shrink back to its original flat shape, causing it to pull out of recesses. Professional wraps use Cast Vinyl, which is thinner, more conformable, and designed for complex curves.
- Inferior Adhesives: Low-grade adhesives can become "permanent" too quickly (making removal a nightmare) or fail to bond to the paint entirely.
- Lack of UV Over-Laminate: Without a high-quality protective laminate, the sun’s rays will bleach the ink and turn the vinyl brittle within months.
| Feature | "Budget" Vinyl | Premium Cast Vinyl |
|---|---|---|
| Expected Lifespan | 12 - 24 Months | 5 - 7+ Years |
| Complex Curves | Prone to lifting/shrinking | Perfect Conformity |
| UV Protection | Minimal to None | Advanced Over-laminate |
| Clean Removal | Risk of adhesive/paint damage | Safe & Easy Stripping |
← Swipe to compare →
Take a Deeper Look: The Science of Materials 💡
Choosing the wrong vinyl is the most common mistake we see businesses make when trying to save on upfront costs.
If you want to understand exactly why Cast Vinyl is the industry standard for commercial fleets - and why Calendered Vinyl often leads to early failure - check out our dedicated comparison guide.
🔬
Expert Deep Dive
Want to know the technical difference? Read our full breakdown of Cast vs. Calendered Vinyl to see which is right for your fleet.
Read the Full Comparison →3. Poor Installation Techniques: The Human Factor
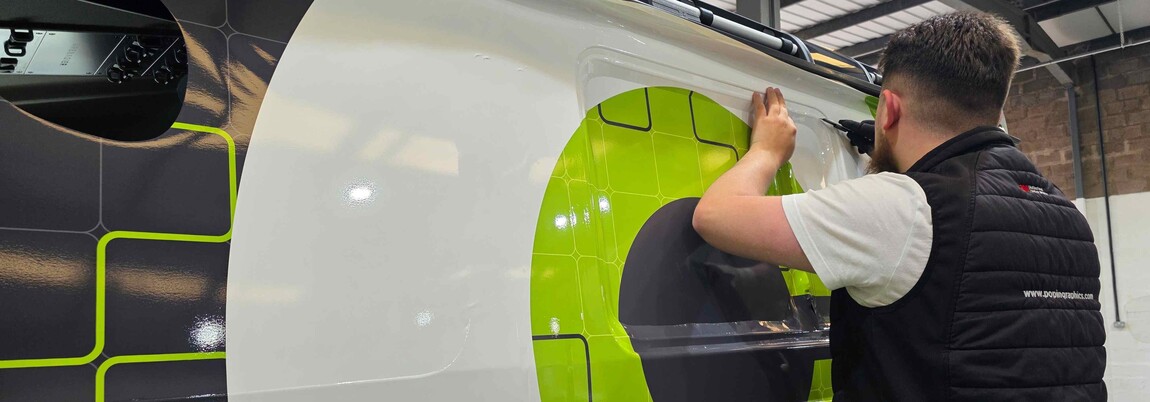
Even the most expensive, premium cast vinyl will fail if it isn't applied by a master technician.
Vehicle wrapping is a high-precision craft that requires a controlled environment and an expert understanding of material tension.
When an installer lacks experience or rushes the process, they "fight" the vinyl instead of working with it.
This creates built-in stress that inevitably leads to failure once the vehicle is out on the road and exposed to temperature changes.
Common Installation Errors:
- Overstretching: Forcing vinyl into deep recesses without proper technique. The material's "memory" will eventually cause it to shrink back and lift.
- Improper Heat Management: Failing to "post-heat" the vinyl to its limit (usually 85-95°C) to break its memory and set it in its new shape.
- Poor Edge Sealing: If edges aren't trimmed and sealed with surgical precision, dirt and moisture will quickly find their way underneath.
- Environmental Contamination: Installing in a dusty or breezy bay can trap microscopic particles that turn into visible bubbles later.
The Professional Difference
✓ Precision Heat Management
Using digital heat guns to ensure the vinyl "locks" into shape permanently.
✓ Tension-Free Tucking
Techniques that allow vinyl to sit naturally in recesses without being "pulled."
✓ Dust-Free Studio
A temperature-controlled environment to prevent adhesive contamination.
✓ Expert Edge Trimming
Ensuring every seam is hidden and sealed against the elements.
4. Environmental Factors: Surviving the UK Climate
A common misconception is that the British weather is "too harsh" for vinyl.
In reality, a professionally installed, premium wrap is engineered to be completely weather-proof.
From the driving rain of winter to the peak UV exposure of summer, a high-quality wrap acts as a protective skin for your vehicle. However, environmental "failure" occurs when the wrap’s defences are compromised.
If the edges weren't sealed or if budget materials were used, the UK’s unique road conditions - specifically road salt and grit - will find their way under the vinyl and begin to eat away at the adhesive bond.
The wrap only "fails" the environment if the installer failed the wrap.
Built for the British Road
☀️
UV Stability
Resists fading & brittleness
🌧️
Watertight Seals
Zero moisture ingress
❄️
Salt Resistance
Protected against road grit
5. The Maintenance Myth: Why "Low-Maintenance" Isn’t "No-Maintenance"
A common mistake business owners make is assuming a vinyl wrap is indestructible.
While vinyl is incredibly durable, it is a porous material that requires basic aftercare to maintain its structural integrity and vibrant finish.
If contaminants are left to sit on the surface, they don't just look ugly - they can chemically bond with the vinyl and begin to eat away at the UV protective layer and the adhesive underneath.
Critical Maintenance Mistakes:
- Aggressive Chemical Use: Using solvent-based cleaners or "cheap" TFR (Traffic Film Remover) can dry out the vinyl and make it brittle.
- High-Pressure Errors: Pressure washing is fine, but getting the nozzle too close to a seam or edge can "blast" the adhesive bond open.
- Neglecting "Natural" Acids: Bird droppings and tree sap are highly acidic. If left in direct sunlight, they can bake into the wrap and cause permanent staining or "etching" within 48 hours.
❌ Avoid These
- Automatic car washes with stiff brushes.
- Direct pressure washing on panel seams.
- Scrubbing with abrasive sponges or pads.
- Using wax or polish containing silicone.
✅ Professional Care
- Hand wash with a pH-neutral shampoo.
- Keep the pressure washer 12+ inches away.
- Spot-clean bird droppings immediately.
- Use a dedicated "Wrap Aftercare" spray.
🧼 Keep your wrap looking showroom-fresh: If you want the exact step-by-step process for washing your fleet, read our full guide on how to clean and care for your vehicle wrap. We break down the safest products to use and how to avoid accidental damage during cleaning.
6. Substrate Integrity: Your Wrap is Only as Good as the Paint Beneath It
A common mistake is viewing a vehicle wrap as a way to "hide" serious bodywork issues.
In reality, vinyl is a high-conformity material - it mirrors whatever is underneath it.
If the paint is failing, the wrap will too.
For the adhesive to bond permanently, it needs a stable, non-porous surface.
If the substrate is crumbling, the vinyl has nothing to hold onto.
The "Do Not Wrap" Red Flags:
- Rust and Oxidation: Corrosion is an active process. Wrapping over rust traps moisture, accelerating the decay and causing the vinyl to bubble and flake away.
- Clear Coat / Lacquer Peel: If the vehicle's original clear coat is flaking, the vinyl will bond to the "flakes" rather than the van, leading to immediate lifting.
- Poor Previous Repairs: Cheap body fillers or "quick-fix" resprays often lack the structural bond required to withstand the tension of a vinyl wrap.
🛠️ Make sure your car is ready for the shop - check out our vehicle wrap preparation guide first!
At a Glance: The ROI of Quality
To help you quickly diagnose or avoid these issues, we’ve summarised the relationship between the root cause and the visible failure. Whether you are managing a single van or a national fleet, keeping these factors in check is the key to protecting your branding investment.
The Blueprint for Success - How to Prevent Vinyl Wrap Failure
Prevention isn't just about avoiding a "bad wrap" - it’s about ensuring your marketing asset delivers a return on investment for 5, 7, or even 10 years.
By following these five professional pillars, you can virtually guarantee your wrap stays as sharp as the day it was installed.
01. Professional Installation
Ensure your installer uses post-heating and controlled environments to lock the vinyl's molecular memory permanently.
02. Premium Cast Materials
Demand Cast Vinyl with manufacturer-backed warranties from quality industry leaders like 3M.
03. Surgical Surface Prep
A 3-stage decontamination process - including Clay Bar and IPA wipes - is required for a flawless adhesive bond.
04. Dedicated Aftercare
Commit to a pH-neutral hand-wash routine and remove acidic contaminants like bird lime immediately.
05. Smart Storage
Park in shade or undercover where possible to shield the pigments from UV-led fading and brittleness.
Immediate Next Steps - What to Do If Your Wrap Is Already Failing
If you have spotted any of the "red flag" symptoms mentioned earlier, the worst thing you can do is wait.
Catching failure early can save you thousands in restoration costs.
Depending on the severity of the issue, you have three primary paths forward:
- Targeted Repairs: Small lifting edges can often be trimmed and resealed if the adhesive underneath is still clean.
- Panel Replacement: If failure is limited to a single door or the bonnet, we can perform a partial rewrap to match your existing graphics.
- Full Removal & Rewrap: When failure is widespread, a professional removal is essential to protect the vehicle's paint before applying a fresh, premium-grade wrap.
Professional Insight
A failing wrap doesn’t have to be a disaster. For many of our clients, it’s the perfect catalyst to evolve their business image.
Refresh Your Branding
Update Fleet Messaging
Boost Marketing Impact
The Bottom Line - Protecting Your Brand Investment
At the end of the day, vinyl wrap failure is rarely down to bad luck.
It is a predictable outcome based on the choices made before the first piece of film ever touches your vehicle.
When you prioritise premium materials, expert installation, and meticulous preparation, your wrap becomes a high-performing, long-term asset that works for your business day in and day out.
Get these pillars right, and your fleet will look showroom-fresh for years.
Get them wrong, and your branding becomes a liability rather than an asset.
The Verdict
To ensure your wrap performs exactly as it should, always confirm your provider meets these four non-negotiable standards:
✓ Premium Materials
✓ Expert Install
✓ Surgical Prep
✓ Pro Aftercare
Ready to wrap your fleet with confidence?
Get a Professional Quote Today →